

Contact: nicholasKippes@gmail.com
More lessons learned.
Putting this one off to the side for now. I'm fairly pleased with how it has turned out so far. Going through the workflow to make this asset has given me insight into where I need to work on my pipeline. Getting the basic shapes down and keeping my files organized were definitely time-wasters. I also need to adjust my high-poly models to better suit my game res: I'm losing some detail in key areas and just plain making it ugly in others. I'll be sure to carry this information with me as I get back to working on the bicycle.

Any time now.
I'm getting quite close to finishing this rifle. The bakes have come out well so far. Onto nDo and the rest of the Quixel Suite to create some great PBR textures!


Weapons practice
Setting some time aside to help out an indie outfit with some weapon art. Making my way through the bake target models atm. Textures soon to follow!


New Project: 1950 Schwinn Hornet
Working on shaping the frame now. I'm not worried about polycount for the time being, but I'd like to shoot for 3 to 4k tris. I'll be using mid-poly modeling for this asset. Mid-poly means that I'll end up having an asset that's built to be smoothed, but the geometry will flow in such a way that i'll be able to efficiently decimate once all is said and done. I'll also be uving the mid-poly as I go along to cut down on time. This way of modeling takes a bit more time to plan out but in the end, things should go much faster.


Aaaand, it's done.
Here it is. The finished render for the hallway scene I've been working on. I'm pleased with how it turned out. :) Spending some more time trying different setups with the lighting definitely helped the overall look and feel; I think it's much more interesting than my earlier versions that were washed out in blue or green. The subtle particle effect and reflections also added a bit of interest and atmosphere to the scene. Looking forward, I think I'll get more technical (material blending, vertex painting) with scenes I do in the future. Maybe I'll update this one with those elements.
Check out the video in high quality if you can and scroll down for some breakdowns of the scene.


Here are some of the more "involved" materials I created with the help of some great tutorials I found online. The first one is a material that's applying real-time reflections to the floor. Using the alpha channel from the diffuse texture, I was able to mask off the grout, which didn't need reflections. I've bumped up the value of the constant controlling the strength to better show the reflections in the right image.


Check out the video in high quality if you can and scroll down for some breakdowns of the scene.

Props used in the scene.


For the tiled sections of the walls, I faked reflections using another texture I created using the two wall textures (white tile and green paint). You can see the effect slightly in the preview window. Again, I'm using a single constant in the Reflection Power group to control the intensity of the reflection.
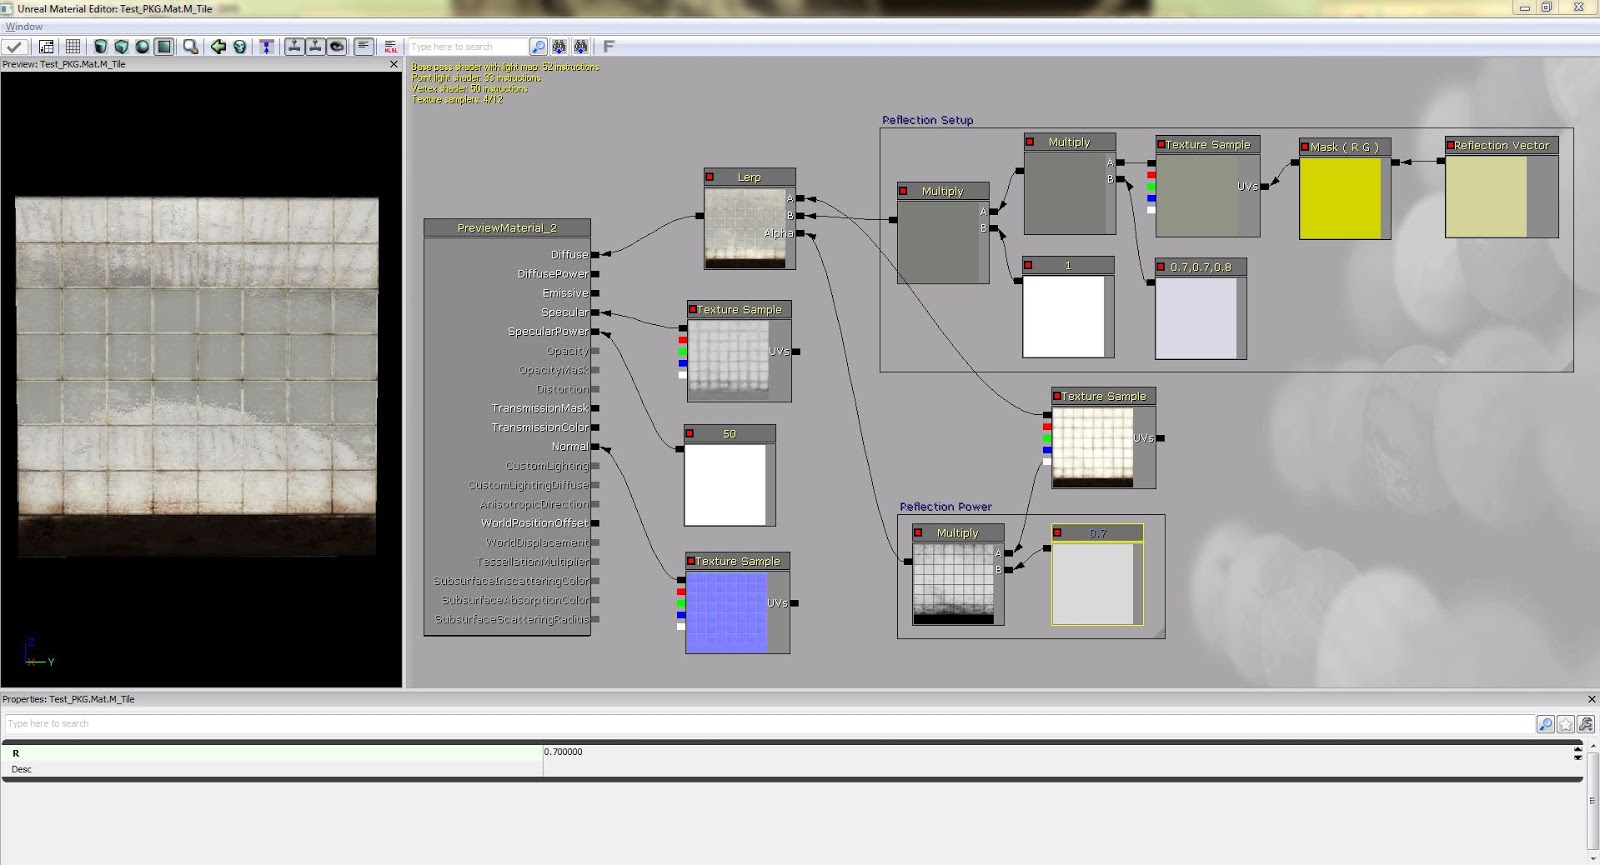
This material, which is being applied to the light and mirror, is using a combination of fake reflections and independent specular control which is achieved by using the rgb channels from a separate texture. Creating a new texture to just control the spec values isn't very efficient, but it was good practice to learn how to use something like this for future work.

Closer to completion
Worked in some updated to the lighting, materials, particles and camera animations. Tweaking and polishing now. :)


Organic practice
It's been a while since I've created a more organic asset. Well, finished one, at least. :) I used Maya, Photoshop, ZBrush and 3D Coat for this one. I even did some concepting beforehand. Insane.


Further into UDK. Materials and more lighting.
This time around I decided to get back into the material editor a bit more. I created a water material that moves downstream to give a bit more life to the scene. Once I figured out how to pan each section of the texture at different speeds, it was just a matter of creating a texture with specific alpha information in the RGB channels. Having the sparkle effect in the middle of the texture came about from a "happy accident" when I multiplied the alpha from the panning texture with the stationary one. Mucked around with the lighting as well. It's still a bit harsh so I'll mess with it some more next time I visit this scene.
Speaking of which, the next goal for this scene is to get a simple rotation animation on the clouds and birds in the sky. That, and I'll try to get some texture updates so I can mess with the specularity on these assets some more. Mucho graciado to Joe Joyal for helping me get up to speed with the material editor.


Architectural assets, back into UDK
This is an exercise I did to practice some architectural, modular modeling and texturing. I'm also trying to get back into UDK. I put my pieces into UDK, made a prefab from those assets, set up some basic materials, messed with the lighting a bit and grabbed a couple screenshots from the editor window after baking the lighting. I'm using 2 UV channels on each asset; the first channel for textures and the second for lightmaps. Look below for an image showing the normal and AO maps I derived with xNormal using high-poly models.


Shhh, it's a secret.
Here's a screenshot of what may or may not be a game I'm working on. Search this blog carefully for more clues. :)

Generator Prop
This is a piece I completed for a friend of mine. I used a high to low poly workflow to generate the base normal map, then added upon that with elements from the diffuse map, converted using nDo. The diffuse texture is hand painted with the exception of the meters and outlets on the towers.


Concept provided by Angela Ma

Diffuse-Normal-Spec


Indie Game Project
Here I'll be posting images of some work that I've contributed to an independent game that myself and some friends of mine are working on. I'm working with some really talented people on this and the game's coming along quite nicely. :)


Many thanks to Michael Ballentine, Alexander Robinson and Jason Gianetti for their contribution to the design of some of these props. :]
Subscribe to:
Comments (Atom)